
The Challenge
I’m sure many of you have found yourselves—or currently are—here. In September 2017, my company was ready to take the plunge into Windows 10. All third-party software has been tested and we wanted to “get with the times” with our Windows fleet.
Historically, our Windows management has been akin to the wild (wild) west, as we are mostly an Apple shop. We didn’t have an MDM, configuration management, or package deployment solution in-place to facilitate. We had nothing but a standard Windows domain. Nevertheless, our Windows users deserved the same experience that our Mac users received.
Our Windows fleet is about 70 devices spread across three locations. Not too many by most standards, but I wanted to treat this upgrade as I would a fleet of 1,000 Windows devices. My teams knee-jerk reaction, which is how we traditionally handled any Windows maintenance, was to re-image every device and return it to the user. I declined this option for two reasons:
- There was no way I was going to spend the time to meet with all 70 users, swap out their device, and then help them reload their preferences onto the re-imaged device.
- It’s detrimental to the user experience; forcing users to reload their preferences and the potential of losing software that wasn’t tracked our team does not provide for a great experience by any means.
I wanted my deployment to be seamless for the user. I sought out to make this a zero-touch process that didn’t impact the user experience.
The Solution
I took the time to inventory what tools of use we had on hand. Purchasing an MDM, config management, or package distribution did occur to me. However, I felt that this investment may be sunk into a platform that worked better with Windows 7, rather than Windows 10 and I know we wanted to investigate this more down the road.
Here’s what we had:
- A Windows domain
- A robust internet connection
- Fairly unlimited server resources via Amazon EC2
After some research that led me to dozens of guides for deploying Windows 10 via SCCM I came across this article: https://docs.microsoft.com/en-us/windows/deployment/upgrade/upgrade-to-windows-10-with-the-microsoft-deployment-toolkit
This was it, I told myself. we had everything we needed. So I got to work building out the infrastructure. The toolkit documentation from Microsoft was very simple to follow, so I was able to come up with a finished product fairly quickly.
Roadblocks
I went ahead and deployed to my first machine, but there were a few initial concerns that came up along the way:
User effort was required to start the process
Users were required to navigate to \\MDTserver\deploymentshare$\scripts\LiteTouch.vbs in order to kick off the process
Local Administrator access was required to start LiteTouch.vbs
Our users are all standard users, so this wouldn’t work without admin intervention
User interaction was required throughout the process
Users had to click through a wizard before the actual deployment started; as well as authenticate with a network account with access to to the SMB share that hosted the deployment

The Product Key value was ignored in the Deployment Workbench
Although I provided a product key during the creation of the task sequence, I found this attribute was ignored and machines were not automatically activated
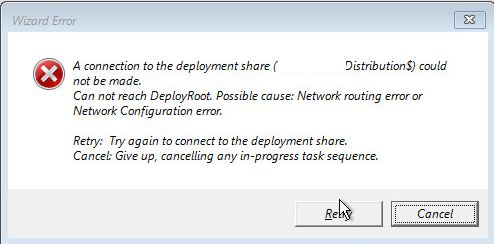
The deployment would only start if the user was connected to Ethernet
This was actually hard to discover since the error message is fairly cryptic. Here it is for those who come across it (love the very extreme cancel option; don’t be deterred!):
Workarounds
User effort was required to start the process & Local Administrator access was required to start LiteTouch.vbs
This solution killed two birds with one stone. I was able to workaround these obstacles by utilizing a domain user that had local admin access to our machines and the PsExec command line utility from a remote machine.
Here’s the command I used:
psexec \\hostname1,hostname2 -i -u domain\user cmd.exe /c \\MDTserver\deploymentshare$\scripts\LiteTouch.vbs
User interaction was required throughout the process
To get around this, I leaned heavily upon CustomSettings.ini located in \DeploymentShare\Control
I was able to answer most of the questions the Deployment Wizard had while satisfying some defaults. Here’s what my file looked like:
[Settings]

Priority=Default

Properties=MyCustomProperty
[Default]

OSInstall=Y

SkipCapture=YES

SkipAdminPassword=YES

SkipProductKey=YES

SkipComputerBackup=YES

SkipBitLocker=YES

UserDomain=domain.com

UserID=UserWhoCouldAuthenticateToDeploymentShare

UserPassword=XXXXXXXXXX

BuildID=W10-X64-1703

SkipBuild=YES

SkipSummary=YES
Here you’ll notice that I was able to supply an authenticating account, saving the user form having to login at this time. Please be careful of the user credentials provided here as they are stored in plain text. To keep mine secure I made a specific account that was locked down to only being able to authenticate to the share and nothing else.
The Product Key value was ignored in the Deployment Workbench
I’m not certain at this time why this wouldn’t work. But supplying the Product Key in both\DeploymentShare\Control\CustomerSettings.ini and \DeploymentShare\Control\TaskSequenceName\Unattend.xml were unsuccessful.
Instead, I utilized Deployment Workbench to add a command line command during Post-Processing:

The deployment would only start if the user was connected to Ethernet
This was less of a technical workaround and more of a people workaround. Although our PC fleet is mobile we don’t have many remote workers, and those that do work remotely will often visit one of our offices. We still have Ethernet ports at user’s desks so we just instructed users to grab an Ethernet cable and plug the device in before their scheduled deployment time. Some hand holding required 😀
The Deployment
After we worked out these roadblocks we were able to get everyone upgraded over the course of just a few weeks. Since I was being cautious I scheduled only a few deployments at a time, taking a bit more time than necessarily needed. Looking back, I could have moved forward with deploying on all machines within the same week. Our network was robust enough to handle more; I suggest you do only as many as your network can handle simultaneously.

How was the deployment initiated? Did you scheduled the VBS script to run?
LikeLiked by 1 person
I initiated the deployment using the psexec command from winrm. As I’ve learned from future deployments of other apps, you can also schedule a script to run as SYSTEM in a scheduled task from GPO. Just be sure to put some logic in your script to detect certain prerequisites so whatever you’re attempting to install doesn’t reinstall every login.
LikeLike